AI / LLM Settings
Desktop users
This page configures model connections for chat and image understanding. Local face recognition, OCR, classification, and semantic search require the desktop AI extension first. Docker deployments do not use the desktop extension.
Built-in Connection
TrailSnap includes a built-in AI connection that works out of the box. It uses the MiniCPM-V-4_6-Q4_K_M multimodal model, supporting image content understanding, tag generation, and other visual tasks.
The built-in connection is shown on the Settings → General → AI Configuration → LLM Connection page with a "Built-in" badge. Built-in connections cannot be edited or deleted.
If you need to use a third-party API, you can add a new connection.
Adding a Connection
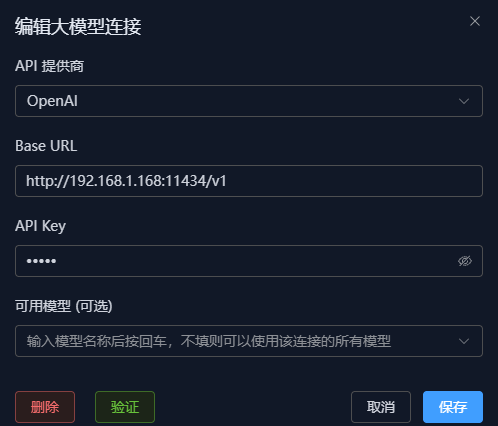
Go to Settings → General → AI Configuration → LLM Connection to add a new LLM connection.
- Select the API type, e.g.
OpenAI,Ollama, etc. - Fill in the base URL and API key.
- Fill in the model name (optional — if left empty, all models available with that API key can be used), e.g.
gpt-3.5-turbo,qwen3.5:4b, etc. - Click the verify button; a success message will appear if the connection works.
AI Chat Configuration
Go to Settings → General → AI Configuration → AI Chat to configure the default model used by the AI assistant (bottom-right corner).
Smart Analysis Configuration
Go to Settings → General → AI Configuration → Smart Analysis to select the connection and model for image content understanding and tag generation. This is a relatively simple task, so a small model is sufficient.
Due to privacy concerns, be cautious when using cloud models from various platforms. Using a locally deployed model is recommended, such as Ollama with qwen3.5:4b, or a local LLM service like vllm.
ollama run qwen3.5:4b- Base URL: The API base URL for the vision model, e.g.
http://127.0.0.1:11434/v1 - API Key: The API key for the vision model. For local Ollama, you can use:
empty - Model Name: The vision model name, e.g.
qwen3.5:4b
Creating a Processing Task
After configuration, go to Task Management → Smart Analysis, select Force Redo or Run Missing Tasks to start analyzing photos (to save resources, screenshots are automatically skipped during analysis).
Viewing Analysis Results
- Go to Toolbox → Quality Cleanup — this shows all AI-analyzed photos sorted by score.
- Click a photo to open the detail panel, then click the top-right button and select "View AI Analysis Results".
- On the home page, the "On This Day" module shows photos from past years (if available), sorted by score with AI-generated captions.